

How to write better tech design docs
This post is for you if you are an software engineer who finds it hard to write Technical Design Documents (TDDs).
Perhaps it feels like a tiresome, form-filling process. Perhaps you just want to start writing code and get moving without the added paperwork.
In this post, I set out a simple guide for writing better TDDs. If done well, TDDs have several benefits - They drive alignment, reduce ambiguity and save a bunch of time by avoiding missteps. It's a key skill of a competent engineer.
Framing
A TDD is a document that specifies the technical design for a given project. Software engineers should ideally write one for almost every project. They typically accompany a Product Requirements Document (PRD).
At large companies, when we are asked to write a TDD, we are often handed a frightening template with 20 sections, named Key Risks or Legal.Our task is to fill in the whole thing, ready for review. This can be incredibly daunting and demoralising. Where should we start? Which sections are more important than others?
Often at this point, we quite reasonably just abandon the idea and get back to writing some code.
How can we rethink this terror, and get something useful from our TDD?
Let's try to break down the overwhelming task into manageable steps. Steps that make sense and don't turn our heads away in horror.
The Breakdown Fundamentally, for any project we need to figure out 5 things. The Why, What, How, Who, When.
These can be ordered into 3 distinct Steps.
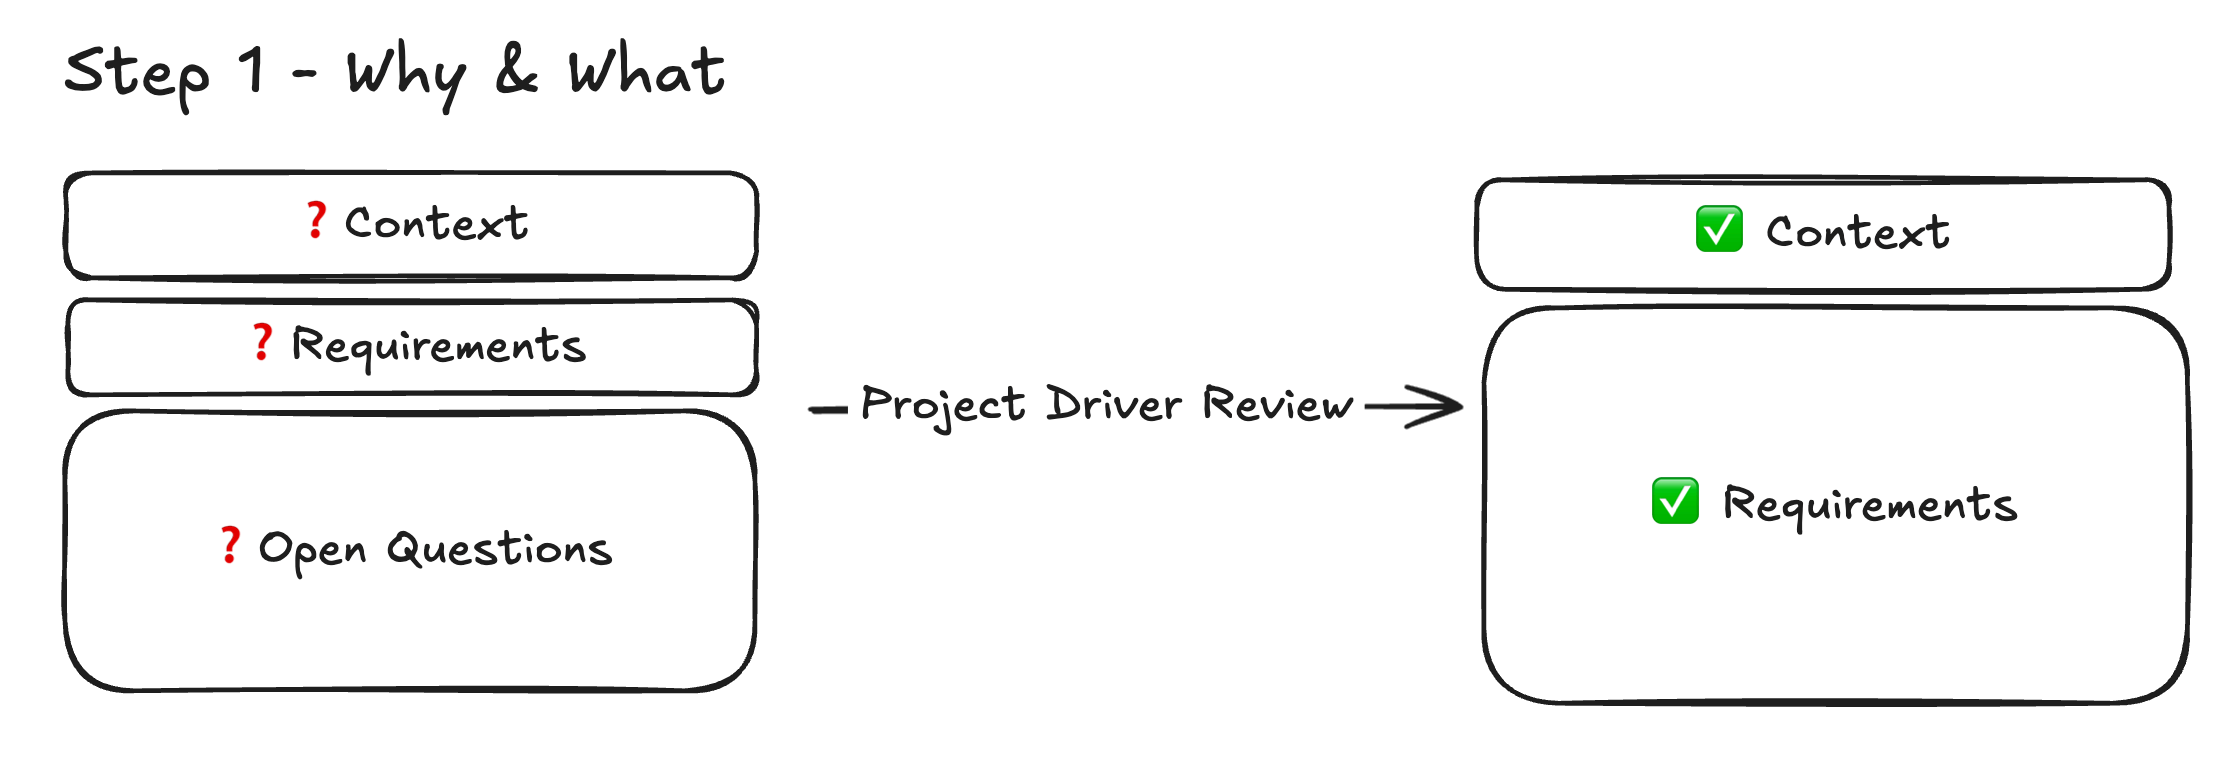
- Step 1 - Why and What
- Step 2 - How
- Step 3 - Who and When
Each Step is a prerequisite to the next one. So let's not think too much about Step 2 until we've nailed down Step 1.
Each step has a main goal, centered around alignment:
| Step | Goal |
|---|---|
| Step 1 - Why and What | Align with the Project Driver on the specifics of what problem we are solving, and why. |
| Step 2 - How | Align with other engineers on how we are solving the problem. |
| Step 3 - Who and When | Align with our manager on who will build it, and by when it will be built. |
If we get to the end of a Step and we haven't achieved the associated goal, we should pause and consider whether or not we are ready to move on.
The following sections go deeper into each Step. As a minimum, I would suggest reading the Common Failure Modes section of each Step. This is the fastest way of identifying whether or not we are making common mistakes in our TDDs.
Step 1: Why and What
Our main goal for Step 1 is to align with the Project Driver on the specifics of what problem we are solving, and why.
The Project Driver might be a Product Manager (PM), and Engineering Manager (EM) or it might even be us. If it is us, we should identify a key reviewer.
The process for Step 1 is as follows: We try to write down the Context and Requirements of our project and, more often than not, we fail.
When we try to do this, we find we often don't know the Context or any Requirements. This is very common. Let's not panic. At this point we introduce the Open Questions section and write down all the questions we can think of about the Context and the Requirements. It might be that all we have is Open Questions. No Requirements at all. That is ok. Open Questions are the key to Step 1.
At this point, we go back to the Project Driver and go through the Open Questions together until we feel like we can write a better Context and an improved Requirements section.
This might take multiple iterations. That is ok. It should be a high-bandwidth back-and-forth. This is how we build alignment.
In short, the process for Step 1 looks like this:
- Try (and initially fail) to write out the Context and Requirements of the project.
- Surface all the Open Questions we have about the Context and Requirements.
- Go and talk to the Project Driver to get answers for our Open Questions.
- Repeat all steps until we don't have any more Open Questions.
Sections in Step 1
The Context section should be concise and specific. Just one paragraph can be enough. Wider context should be detailed elsewhere, perhaps in a linked PRD.
For the Requirements section, we should aim to be highly specific on each requirement and consider what is in scope or out of scope. We should then closely guard the scope. We might do some technical exploration to investigate a requirement, but this should be considered throwaway code. We might need to talk to XFN partners to understand the feasibility of our requirements. Defining Requirements should feel like a collaborative, iterative back-and-forth, where requirements arrive in focus as discussions develop.
The Open Questions section is the driving force behind Step 1. Let's get our questions written down with a date and author next to them. Let's proactively seek answers, setting up meetings and chasing people until we have answers. When we get answers, let's put a date and a name next to the answer so we know when and who it came from.
By the end of Step 1, we should have full alignment with the Project Drive on the requirements, and a complete understanding of why we are doing the project.
Step 1 - Common Failure Modes
Not getting alignment from the Project Driver - If we don't involve the project driver, we won't have alignment on the requirements of the project. This can come back to bite later when they come to us and say "Why are we doing this project? I thought we were building this other thing?".
Not including all key stakeholders in Step 1 - Including stakeholders like Design or QA in Step 1 may feel intimidating, but it's far more challenging to adjust later if we miss their key insights at the start.
Not proactively chasing Open Questions - Some of us find it easy to think up questions, but much harder to go chasing for answers. We should be swift and proactive, chasing down questions and driving clarity into the project.
Moving too early onto Step 2 - If we don't have a clear understanding of the Context and the Requirements when we progress to Step 2, we end up building a solution for the wrong problem and wasting time and effort. Get your Requirements and scope nailed down before you move on.
Writing code - If we write code before we know what we are building, we risk having to throw away our code, and the inevitable frustration that comes with that. Or else we fall prey to the sunken cost fallacy and stubbornly keep our code to sidestep the frustration.
Step 2: How
Our main goal for Step 2 is to align with other engineers on how you are solving the requirements.
The process for Step 2 is as follows: We take the requirements from Step 1 and we design some technical solutions for them. We whiteboard, we brainstorm, we discuss, we prototype. This is the fun bit. We should aim to develop more than 1 solution for the requirements and discuss tradeoffs between them. Once we have written down a few different solutions in our TDD with system designs and specifications, we should review them with a range of engineers. These engineers should come from different teams, with different levels of seniority and different perspectives. Perhaps an engineer from a different team has a brilliant idea that we never even considered.
We should be opinionated and recommend our favoured solution, but remain open to changing our minds.
Often in a review, we will need to revisit one of our solutions and develop it further to address the feedback we have received. This is good. We can set up further reviews as we drive towards an alignment. This is also when we can early-engage cross-functional partners. Step 2 should feel like high-bandwidth iterative back-and-forth between several diverse engineers.
In short, the process for Step 2 looks like this:
- Brainstorm and whiteboard different solutions.
- Develop a few solutions and write them into the TDD with system diagrams and specifications.
- Review the solutions with a diverse range of engineers and discuss tradeoffs. Have an opinion.
- Repeat all steps until engineers have an alignment on a single solution.
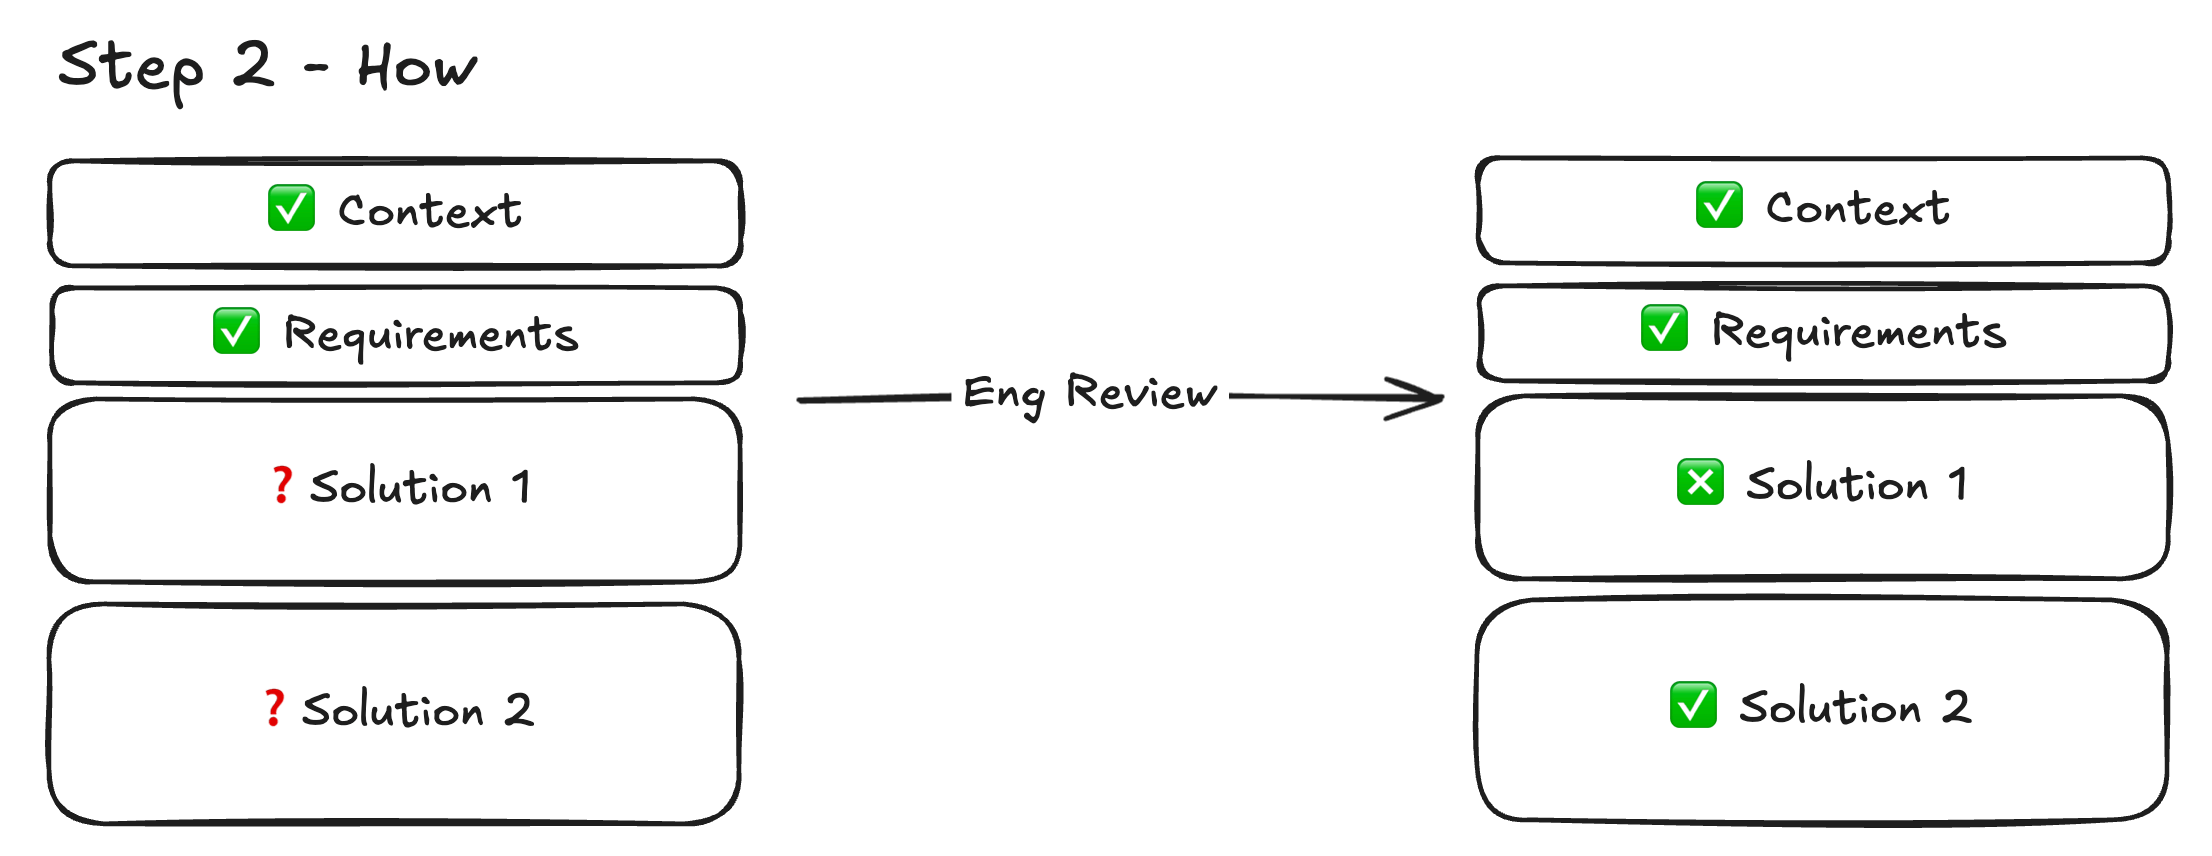
By the end of Step 2, we should have alignment with a diverse set of engineers for our solution. A great side-effect of doing Step 2, is that engineers know the project when they review our diffs. They won't look blankly at our diffs, wondering what on earth we are up to.
Step 2 - Common Failure Modes
Not developing multiple solutions - Often we have a solution in mind from the beginning of a project. We shut ourselves down to other options. This might mean we miss out on a simpler or more elegant solution.
Let's focus on the requirements and be open minded about different solutions.
Not involving a diverse set of reviewers - It is often tempting to solicit reviews from just our EM or a close teammate. This can be limiting. When we introduce external reviewers, we might find that another team has already solved our problem. Let's reach outwards and bring in different perspectives.
Not using diagrams - Almost every solution, however small, can benefit from a diagram. Let's help out our reviewers by graphically drawing out our solution. System design can be very difficult to express in prose.
Not proactively getting reviews - It is our responsibility to solicit good reviews for our TDD. If we share a TDD and passively hope for async reviews, we are setting ourselves up for disappointment. Let's go out and chase reviews. Set up meetings if we need to. Let's ensure we get high-quality reviews before moving on. If someone disagrees with us, it's better to get the discussion going early and drive towards a resolution.
Not having an opinion - We are the ones closest to the problem, so if we can't arrive at an opinion on our preferred solution, we can't expect others to. By having an opinion, we invite others to interrogate it. This produces more effective discussion and faster consensus.
Moving onto Step 3 too early - It sounds obvious really. We shouldn't attempt to schedule the project until we have reached a consensus on what we are building.
Step 3: Who and When
Our main goal in Step 3 is to align with our EM on who will build it, and by when it will be built.
Now that we have established the requirements and a chosen solution, we can progress to planning out the project. The process for Step 3 is as follows: We take the solution and we attempt to break it down into smaller chunks. Once we have the Breakdown, we need to identify any dependencies between the different chunks - which pieces need to be done before others; which pieces can be done in parallel. Once we have this dependency graph, we can try to estimate the work, and plot it onto a Roadmap with Milestones relating to delivered work.
Let's not pretend this is an easy task. All of us know that Roadmaps and Milestones almost never go to plan. But let's also acknowledge that we can gain very useful insights from the act of planning. We can figure out a rough estimate of when the work might be done. We can figure out if we need to allocate more engineers to the project. We can give ourselves a means to track the project. We can track if things are moving too slowly. We have an artifact that can be used to communicate the project to XFN partners and key stakeholders. The Roadmap will inevitably change, it will fall apart. That's ok. We should still do it.
In short, the process for Step 3 is as follows:
- Breakdown the solution into meaningful chunks.
- Draw out a dependency graph between the chunks.
- Identify key Milestones that represent delivered work.
- Discuss how many engineers need to be allocated to the project.
- Try (and inevitably fail) to plot the project onto a Roadmap.
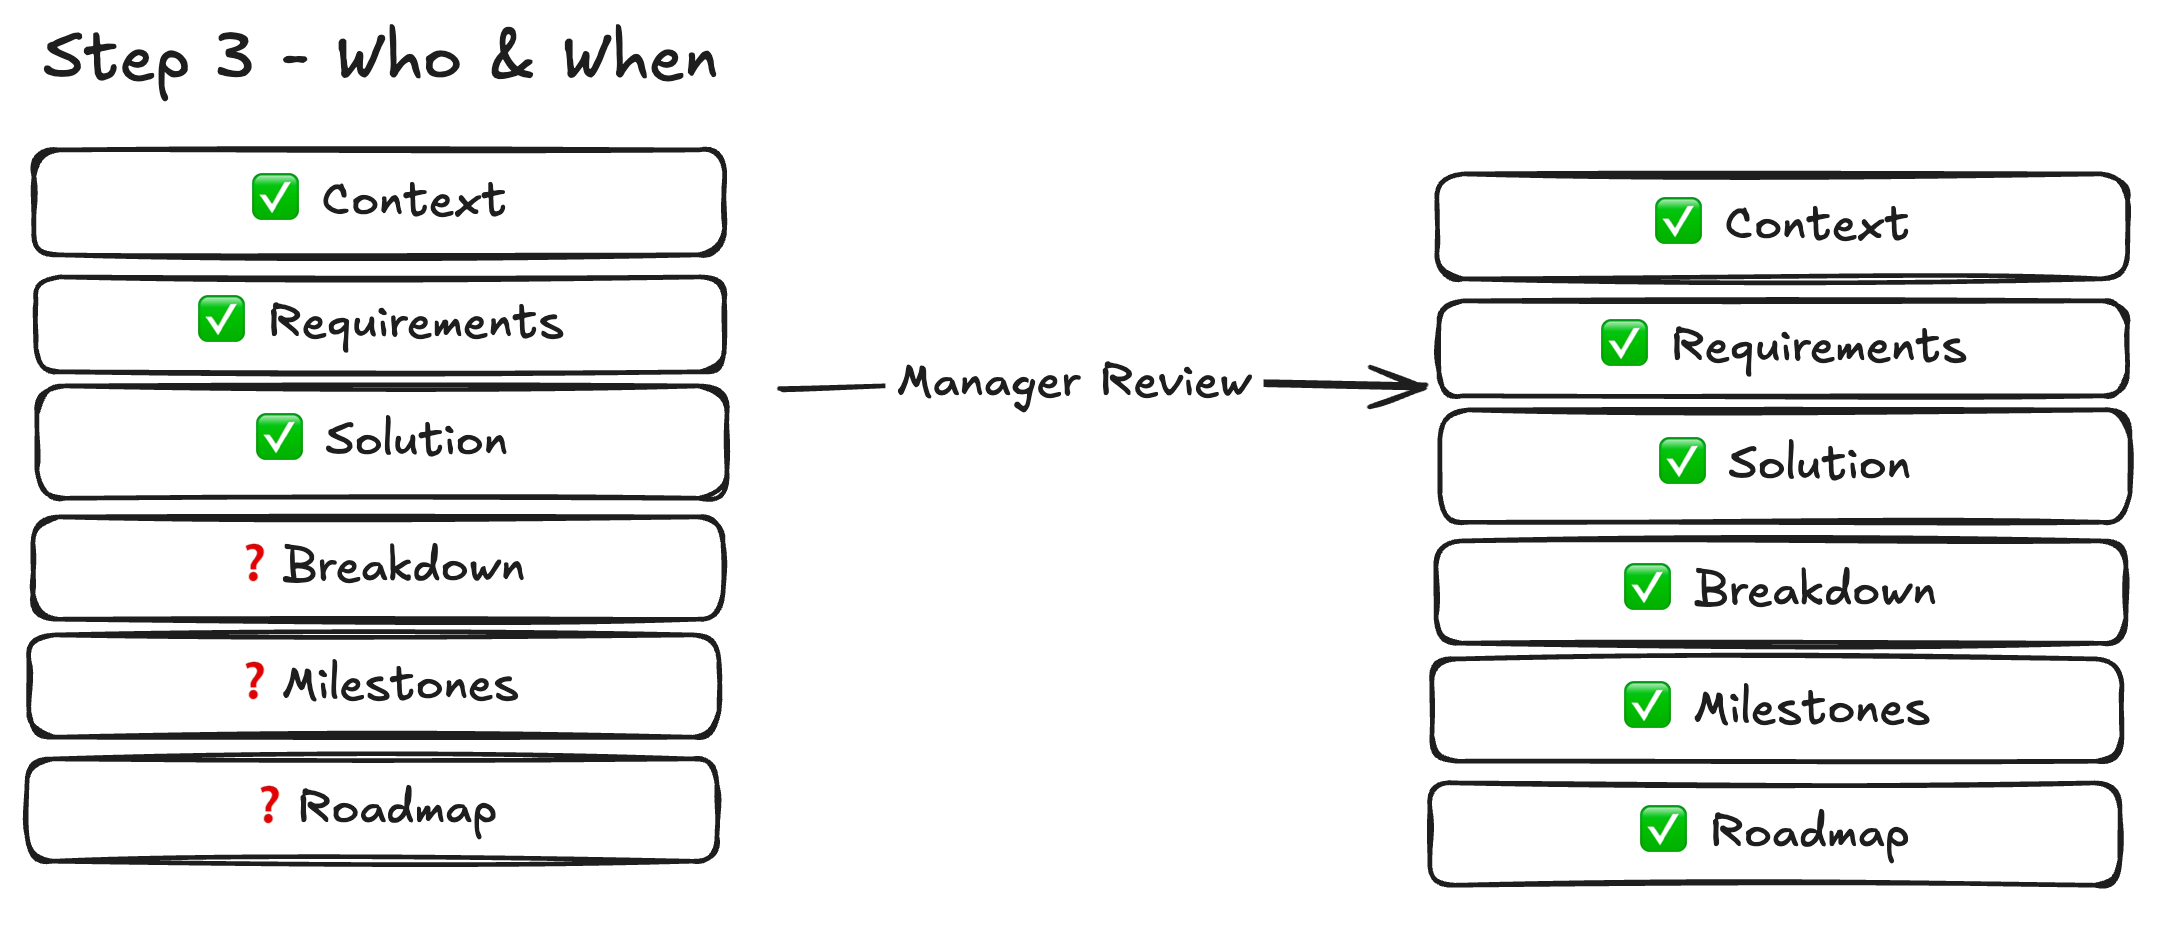
By the end of Step 3, we should have alignment with our manager on our Breakdown, Milestones and Roadmap. We can now embark on our implementation.
Step 3 - Common Failure Modes
Not breaking down the project - Often we feel we can just start coding and the project will reveal itself to us. But skipping the breakdown means that we can't parallelise the project by working with other team members. It means we can't identify dependencies between work and plan accordingly.
Not identifying milestones - Milestones help communicate progress, or lack of it. With milestones, we can track whether or not a project is going to plan, and react accordingly. Without milestones, Managers lose visibility on a project. They are left unable to help course-correct when things start going wrong. During the project, we should therefore frequently revisit our milestones to check if the project is on track. If the project is at risk of slipping, we should communicate it.
Not working closely with our manager - Step 3 is our chance to bring our manager into even closer engagement with the project. If we can get our manager on board with the Roadmap and Milestones of our project, we can use our manager to help plan the project, and speak on our behalf in stakeholder meetings.
Summary
This post offers a simple step-by-step guide for writing better TDDs that won't leave you feeling bewildered. This template is intentionally generic and lightweight. You might find templates at your workplace have several other sections like Key Stakeholders, Risks, Dependencies, QA Plan or Legal. You can figure out whether or not you need to involve these other sections in your TDD.
This guide is designed to surface ambiguity early and drive clarity. To surface cross-functional dependencies early and involve these partners in the design phase. To remain in the Problem Space for longer, in order to stay open to different solutions. To drive alignment through high-bandwidth iterative and proactive communication. And ultimately, to build the right thing that solves the right problem without wasting time or code.